Wednesday, May 30, 2007

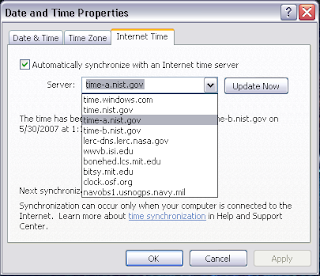
How to add new Internet Time Synchronization servers to Windows XP.


Serious Note:

Modifying the registry can cause serious problems that may require you to reinstall your Windows. Use this information provided at your own risk.

To add more time synchronization servers, find this registry key below.

[HKEY_LOCAL_MACHINE\SOFTWARE\Microsoft\Windows\CurrentVersion\DateTime\Servers]


Add these other “strings” into that registry location.
Backup your registry and be careful not to input bad data values, check your work when done is my motto.

------------------------------------
Default = 1 ----- (((Do not change this value; it is only the server you are using now.))) -----

1 = time.windows.com
2 = time.nist.gov

----- (((Do not enter these instructions into the registry.

{You will create these other strings then name them, afterwards enter the server data; when done it should look exactly like this below.} ))) -----

3 = time-a.nist.gov
4 = time-b.nist.gov
5 = lerc-dns.lerc.nasa.gov
6 = wwvb.isi.edu
7 = bonehed.lcs.mit.edu
8 = bitsy.mit.edu
9 = clock.osf.org
10 = navobs1.usnogps.navy.mil

----- Now close the registry editor and you are done, those new servers will now show up in the server synchronization choices list shown above. -----
Monday, May 7, 2007

How to reset Tcp/IP manually when Winsock registry is Corrupted!

When you think that the computer LAN connection has limited Connectivity or not able to access any internet caused by Virus infection on LSP ( Layered Service Provider)
Method 1: Using Netsh Command
Start, Run, Type netsh winsock reset

& Enter.


Then reboot the computer.

Then, check the internet connection.


If the method 1 is not working, then try method 2.

Method 2: Manually Delete and reinstall TCP/IP
Step 1: Delete the corrupted registry keys
Warning : Before you delete registry Entries or keys, please export or backup.

1.Click Start, and then click Run.
2.In the Open box, type regedit, and then click OK.
3.In Registry Editor, locate the following keys, right-click each key, and then click Delete:
HKEY_LOCAL_MACHINE\System\CurrentControlSet\Services\Winsock
HKEY_LOCAL_MACHINE\System\CurrentControlSet\Services\Winsock2
4.When you are prompted to confirm the deletion, click Yes.

Note
Restart the computer after you delete the Winsock keys. Doing so causes the Windows XP operating system to create new shell entries for those two keys. If you do not restart the computer after you delete the Winsock keys, the next step does not work correctly.
Step 2: Install TCP/IP (On Folder option, Check Show hidden files and folders on View
1.Right-click the network connection, and then click Properties.
2.Click Install.
3.Click Protocol, and then click Add.
4.Click Have Disk.
5.Type C:\Windows\inf, and then click OK.
6.On the list of available protocols, click Internet Protocol (TCP/IP), and then click OK.

If Internet Protocol (TCP/IP) does not appear, follow these steps:
a. Click Start, and then click Search.
b. In the Search Companion pane, click More advanced options.
c. Click to select the following three check boxes:
Search system folders
Search hidden files and folders
Search subfolders
d. In the All or part of the file name box, type nettcpip.inf, and then click Search.
e. In the results pane, right-click Nettcpip.inf, and then click Install.
7.Restart the computer.

How to Connect 2 Wireless Routers as Wirelessly

Hello Everyone,

Today, I have an interesting topic to share with you guys.
It is How to Connect between 2 Wireless routers (or more) as wirelessly to extend the existing Wi-Fi network. It is a really sweet solution for a certain company who wants to have strong wireless connection and wired switches in a large sharing space between their host PCs, and who is not possible to have any further installation of CAT5e Connection on the wall due to their limited expenses.

(You may say how about just using the Wi-Fi expander???) - it may help some different issues but not enough solution sometimes.

The above solution for the topic is really possible but there are some limitation unfortunately.

1. You have to use "Linksys WRT54G" router family only.
2. You have to obtain and to upgrade "Open Source (hacked) Firmware for the routers . Due to Original Firmware doesn't have the required function(is called WDS(Wireless Distribution Serivce) to setup what we want. ) - It might be illegal, so be careful!!!

Once these two requirements are satisfied, you are ready to go to fun.

How to Setup?

1. You have to obtain the hacked firmware first and apply on to all WRT54G wireless routers.
2. The routers must have in the same subnet range and in the same wireless channel.
3. Setup AP1 with main gateway for your ISP Connection and DHCP on.
4. Setup SSID and no Encryption (it will be done after WDS connection verified)
5. Setup AP2 (and other APs) with DHCP off.
6. SSID setup could be different name and check Wireless MAC Address.
7. Setup each AP's IP Address diffferent from AP1 but the Gateway is the same as AP1.
8. On AP1, Put the AP2 (or all other APs) MAC Address on WDS settings with each AP's SSID.
9. On Ap2( or all other APs), put only main AP1's MAC Address on WDS settings with AP1's SSID.
10. Setup the Encryption after verifying WDS connection between all Wireless APs.

Then, enjoy your Wi-fi extention.

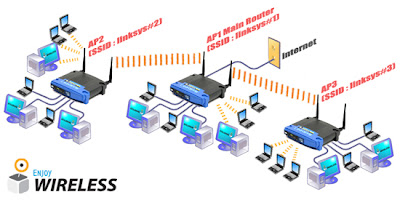
The below image is an example of the possible connection.


* The image is from http://www.benchbee.co.kr/hardware/BenchLecture/read.asp?serial=25&page=2&search_title=0

(Sorry, it is not English to read, but the ScreenShots Are Universal.)

Friday, May 4, 2007

New user photo added.

Hello All this is a pic of a 2005 Suzuki S50, purchased by our favorite Geek Dwayne.